Case Studies
Choosing a proper print size is not an easy job, as there are a lot of details to take into account.
Before jumping right ahead and printing out your design, you have to consider a few things, such as standard print sizes, image resolution, correct placement, and so on.
If you’re new to printing and don’t know where to even begin, don’t worry. Here’s our ultimate guide for print sizes to make sure your prints come out with the best possible quality.
When you’re preparing to print your design, you have to consider two factors: the size of your print and the resolution. These are essential to making sure your design looks clear and crisp when printed.
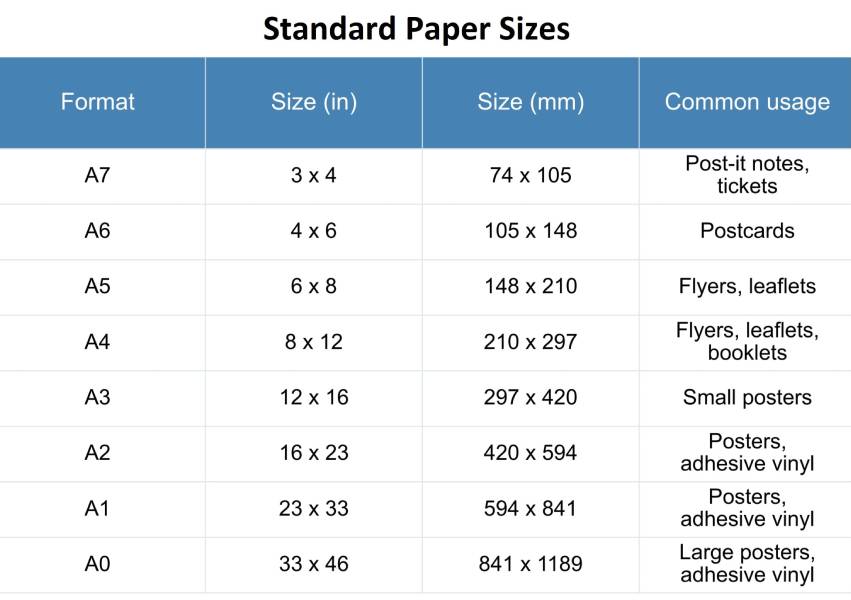
Firstly, let’s talk about the standard paper sizes and what they’re commonly used for:

As to the resolution, let’s have a glance at what’s recommended for each standard print size.
Now that you have a cheat sheet for the most-used print sizes, we want to dive deeper into specific print products to examine further how you should print them.
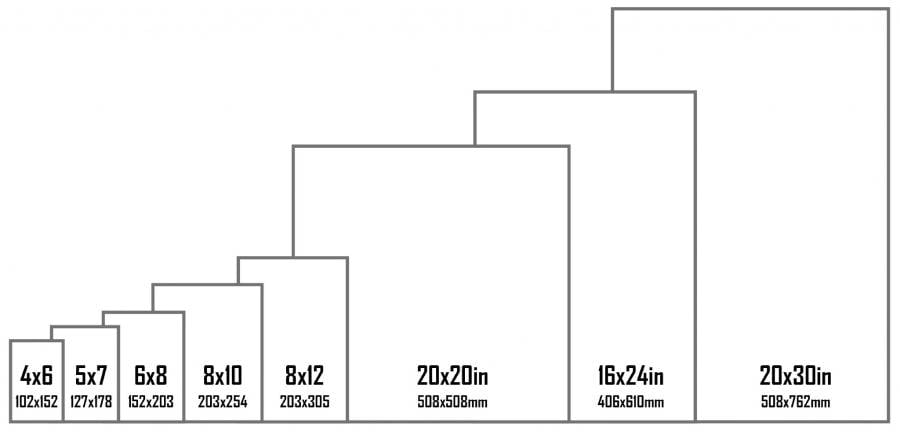
When it comes to photo printing, the standard print sizes may seem confusing, as there are a large number of options to choose from. The main reason for this variety is that two different printing systems are used in photo prints.
The first one is the Inkjet system or the paper size system that we discussed earlier. These are the standard sizes often referred to as A0, A4, etc. The dimensions for the printing sizes vary greatly, starting from 2.91″ x 4.13″ and going all the way up to 33.11″ x 46.81″.

The second system of photo printing is more common and is used by most photo printing labs around the world. In this system, there are eight standard photo print sizes to choose from. The smallest size of a photo print in this system is 4 x 6 inches, and in case you need to size up, you can go up to 20 x 30 inches.
Flyers and brochures can be a handy marketing tool. Whether you want to promote your brand, print out your menu, or make party invitations, first, you’ll need a clear picture of how your design looks on real paper.
The standard flyer, known as a letter flyer, has the A4 paper format. Thanks to its larger size, it can contain quite a lot of information. A letter flyer often serves as a restaurant menu, product list, educational material, and so on.
Then, we have smaller A6-sized flyers. They don’t offer as much space for detailed information. You can use them to introduce your company, list products or services, promote events, concerts, or parties.
Lastly, there are narrow and long DL-sized flyers that we often see as cafe or bar menus, event invitations, short announcements, etc.
The same sizing also applies to brochures. The main difference is that brochures have folds, and therefore, can contain more information. The number of brochure folds, as well as their arrangements, can vary depending on how you want to present your information.

Poster prints can be used both for personal and business purposes. You can frame posters and use them as unique interior design pieces. They can also be equally useful as an advertisement tool for businesses.
There are three typical poster sizes: small, medium, and large. Depending on the usage purpose, posters can have irregular custom sizes as well.
A small poster is the size of an A3 printing paper, which is about twice the A4 paper size. This print size is well-suited for bulletin walls, special offer announcements, concert or festival promotions, and more. As the space is limited, try to include smaller texts on these posters. A few eye-catching, bold phrases are ideal.
If you want to size up, a medium poster might be the right choice for you. The measurements are 18″ x 24″, which makes it slightly bigger than the A2 format. Medium-sized posters are used for product advertisement, bedroom wall decoration, event announcements, and other purposes.
To go even bigger and bolder, use a large poster. It’s considered the standard international poster size, with dimensions of 24″ x 36″. This size is usually the go-to for entertainment companies, exhibitions, cinemas, music festivals, and so on. Large posters give you a lot more room for creativity and big, vibrant visuals.
Business cards are the ambassadors of your company. Their smart and thoughtful design is crucial to present your company in the best light. You can choose to go with the classic standard card or give yours a new unique shape. There are no right or wrong answers, as it all depends on your specific business needs.
The standard print size of a business card is 3.5 x 2 inches. Some cards also have an additional bleed area designated for more design elements. The standard card is a practical choice. Not only does it look elegant and classy, but it also fits perfectly in wallets and card-holders.
As mentioned, business cards can have custom sizes and shapes, as well. Some businesses prefer a square card with dimensions of 2.5” x 2.5”. Others opt for rounded edges or uniquely shaped cards. This way, your card might not fit into a standard card-holder, but it will definitely stand out among dozens of others.
You can experiment with the background colors and textures to give your card more character. We recommend keeping the text and design elements minimal on your card. Only include essential information and contact details. If you need more space, use double-sided business cards.
Magazines and catalogs can be in portrait or landscape. The two most common print sizes for magazines are 8.5” x 11” and 5.5” x 8.5”. The first one is considered the standard and is almost identical to an A4 paper. It’s also known as a US letter magazine. The other one (5.5 x 8.5 inches) is equivalent to an A5 paper and is called the digest size.
For comparison, Vogue and Cosmopolitan are sized 8 inches by 10 7/8 inches, which is quite close to the standard. Forbes is slightly larger (9″ x 10 7/8″) but still doesn’t divert much.
Square magazines and catalogs (8.5” x 8.5” or 5.5” x 5.5”) are also found sometimes, but they’re not nearly as popular.
As to book prints, the standard sizes are the following:
The genre of the book also matters. For example, mass-market paperbacks are a common choice for fiction books. Trade paperbacks and hardcovers are used for novels, textbooks, and memoirs.
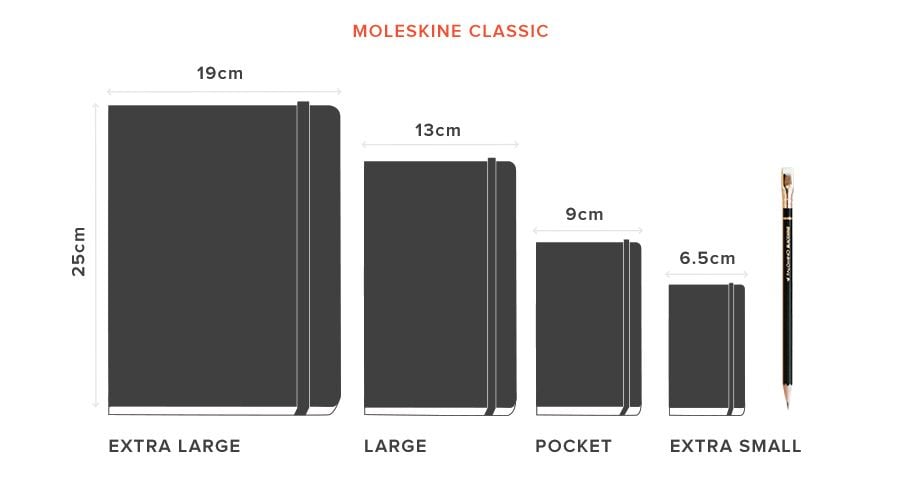
Notebooks sizes are quite flexible but still not exempt from international standards. Although the sizing might somewhat vary based on the brand, the main formats are the following: extra-large, large, pocket, extra-small.

As a rule of thumb, classic extra-large notebooks are measured 7.5 x 9.8 inches, which is smaller than an A4 paper. Because it offers a spacious area, this size is great for art sketchbooks.
Large notebooks are mostly 5 x 8.3 inches (similar to A5 format). This size is common for planners, bullet journals, and so on. Next up, is the pocket notebook (3.5 x 5.5 inches). While it may not fit into your pocket, it’s small enough to carry around with you, as you never know when your next brilliant idea is going to pop up.
Lastly, some brands offer extra-small notebooks with 2.5” x 3.9” measurements. This matches the smallest paper size on our list—A7. The standards may slightly change from country to country, but most brands tend to follow these measurements and print sizes.
Having your own merch is trendy, fun, and exciting. But it also requires patience, planning, and attention to detail. Depending on the type of t-shirt, the printing details and requirements may differ.
If your design is quite big and you want to display it on the front of the t-shirt, your imprint area is 12″ x 14″ at most. Make sure the size of your design doesn’t go beyond that.
Smaller designs, like brand logos, are usually placed around the chest area. You can position your design on the right, left, or center. But try to keep it under 5 x 5 inches. The best size for a logo print is about 3.5 x 3.5 inches for an adult’s t-shirt.
Small designs also look great on the locker patch area and the sleeves. The sleeves give you less room to work with, so keep your design not larger than 3.5 x 3.5 inches.
The bottom of a t-shirt is a smart choice for medium-sized imprints. Whether you pick the right side or the left, the recommended size is about 5 x 6 inches.
Other factors that play an important role in good-quality t-shirt prints are the shirt fabric, printing method, and so on. Don’t overlook them to make sure you avoid unpleasant surprises. You can experiment with different types of t-shirt mockups to see what works best for your design.
Now that you have finally figured out the right print sizes and dimensions for your prints, what’s next? Well, before you rush into the print shop, we recommend you try mockups to see exactly how your prints fit on real-life objects. Mockups are professional photographs in different settings that can be used to display your design.
Another advantage mockups will give you is to market your products before you even start printing them. Put your designs out into the world and see how your friends or customers react. Based on the feedback you receive, you can easily adjust and modify your designs or print sizes to make sure they are just right!
Renderforest offers you a wide variety of professional mockups. Ranging from apparel to branding and product mockups, you will find any template you need.
If you’re wondering how to create mockups, it’s pretty straightforward. All that you have to do is pick your desired setting and upload your design file. Voila! Now you have a clear picture of what your print looks like in real life.
Printing your favorite designs on a set of different objects can be an enjoyable experience. But to make sure your prints come out the way you visualized them in your mind, you’ll need to plan the printing details beforehand. Pay close attention to the size of your print and what resolution it requires.
Use mockups to get a realistic preview of your products before you print them out. Don’t be afraid to experiment and make adjustments. It may take longer than you expected, but the result will be worth it. So grab your designs and happy printing.
Click the button below to start creating your first mockup today.
Article by: Renderforest Staff
Dive into our Forestblog of exclusive interviews, handy tutorials and interesting articles published every week!
Read all posts by Renderforest Staff


