Design
In the list of promotional tools offered by YouTube, YouTube end screens and cards hold a special place. The feature was launched in 2016 as a substitute for YouTube Annotations, which were not very useful and even less mobile-friendly. Since then, because of its simplicity in use and effectiveness, the tool has become beloved by many channels.
In this article, we’ll speak about what YouTube end screens and cards are, and how you can incorporate them into your videos.
YouTube end screens and end cards are clickable boxes that you can add to the last 20 seconds of your videos. They prompt the viewers to take a specific action: watch a video, subscribe to a channel, click on a playlist, etc. Think of them as call-to-action add-ons to your video. You can also add teasers for upcoming content (you can make use of teaser video templates for that).
In case you are looking to increase viewership and enlarge your subscriber base, end screens can become a powerful addition to your video marketing toolbox. Appearing at the end of the videos, they are seen by the viewers who are already engaged with the video (otherwise they wouldn’t watch it till the end!) This increases the chance of them taking action, thus boosting viewership or directing traffic to your channel.
Depending on your goal, end screens, and cards offer different elements that you can use to persuade your viewer to take the desired action. Keep in mind that you can create one using the free YouTube outro tool.
Now, let’s look at how you can add an end screen to your video. There are two ways on YouTube to do this: adding an end screen when uploading the video and adding an end screen to an existing video. Let’s take a look at both of them separately.
Start by uploading the video to your YouTube channel. Please note that to add an end screen to your video, it needs to be at least 25 seconds long. In case you are new to YouTube and are not sure how you can do it, check out our article on how to upload a video to YouTube and change the video thumbnail.
Once your video has been uploaded, and you’ve set the title and added information about it, the next step is the “Video Elements” section.

There, you have two types of elements that you can add. Let’s start by adding an end screen.

Here, you can either import an end screen from another video from your channel or manually design a custom end screen from scratch.
Clicking on “Import From Video” will redirect you to the videos on your channel. If you’ve previously added end screens to your videos, you can simply import them by selecting the video. But if this is your first time adding end screens, you need to set up an end screen from scratch.

To start creating your first end screen, choose “Add.” In the pop-up window, you can add end screens and edit the settings to match your needs.
Use the YouTube End Screen templates on the left to simplify the process of adding an End Screen. Click on the template to add it to your video.

Alternatively, you can add end screen elements one by one, creating a custom End Scene for the video. For this, click the “+” button on the upper-right side of the pop-up window. Whether you add an end screen template or create an end screen from scratch, the editing process of the end screen elements will be identical.
There are five element types that you can add as part of your end screen: video, playlist, subscribe button, channel, and a link. The first four elements are available for all channels. However, to add a link, your YouTube channel needs to be part of the YouTube partner program, and monetize your channel.
Let’s take a look at the remaining four elements separately.

The video element is the one you need to go with if you want to redirect your viewers to watch a video. Choose one of the three options: always show your most recent upload, show each viewer a custom video that is best for them, or choose a specific video.

In the specific video section, you can add a video from your YouTube channel. You can also search and attach any video on YouTube.

Once you’ve selected the video, you can change the element size by dragging it from the corner, and moving it around to find the best location for it.

The next element is the playlist. Here again, you can choose any of your playlists, or search and add any public playlist available on YouTube.

Simply search and click on the playlist to attach it to your video, then adjust the size and location.

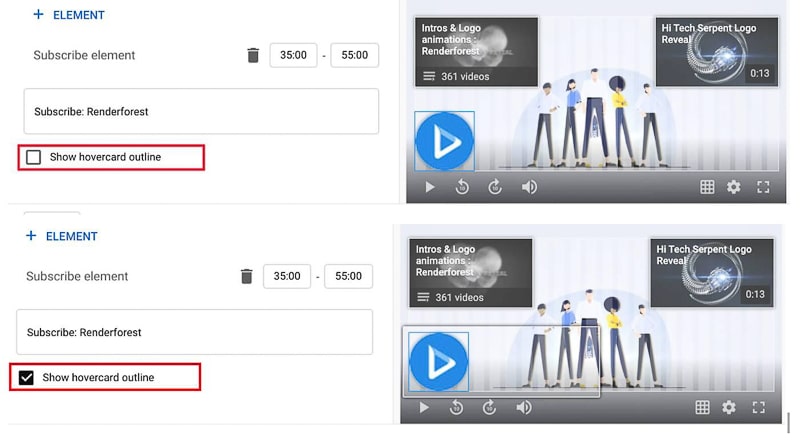
In case you want to drive a subscription to your channel, you can use the subscribe element. A small square with your channel art will appear, hovering over which will give the viewer more information about your channel, and show the “Subscribe” button. Clicking the element will redirect the viewers to your channel. In case you plan to use the subscribe element as an end screen often, we would advise you to goth your Youtube logo as your channel art, as it will give the viewers a clearer understanding of the purpose of the element.
To see the size of the element, and adjust it, tick the “Show hovercard outline” box. This is a handy feature in case you don’t want the end screen distracting the viewers.
The last element is “Channel.” This element is very similar to the subscribe button. However, it is only used if you want to promote other channels. For example, if you have a second channel, this element is a great way to promote it.
Once you’ve found the channel, you want to promote, click on it and type a custom message for your audience.

You can then adjust the duration and location of each element from the timeline below. Select each element by clicking on it, and set the duration from the timer right above the element name.

Set the duration of each element, and then drag them around the timeline. In case you add several end screens and don’t want them to overlap, you can set them to appear in order.

Once you are done, save the changes. You will be redirected back to the “Video elements” page. The green tick means your end screen was successfully added. In case you want to change them, click “Edit.”

Adding Screens to an Existing Video
To add end screens to an existing video, go to your page, select the video, and click “Edit.”

From the menu on the bottom right, hit the pencil icon to edit existing end screens or add new ones.
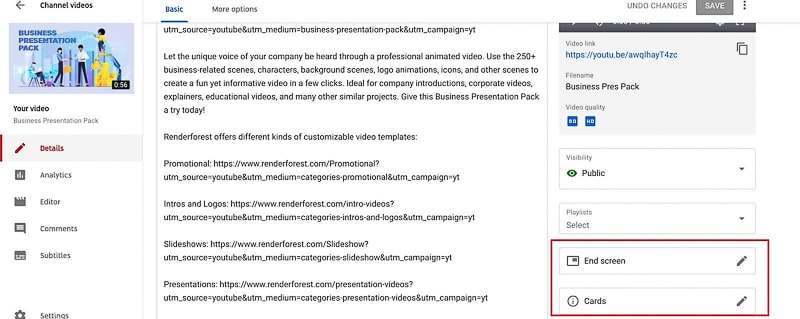
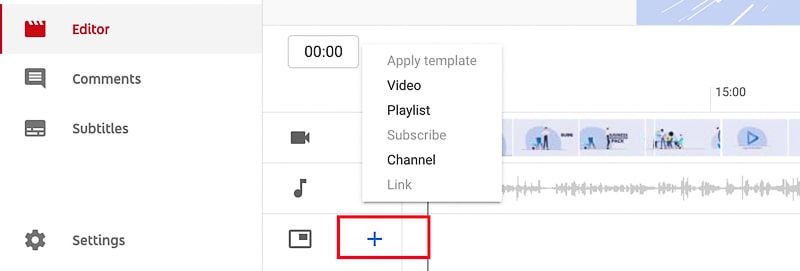
Alternatively, you can go to the “Editor” tab on the left, and add or edit your end screen from there.

Click on the “+” button to select and add elements. From here, the editing process is again the same.
Cards are suppressed during the end screen, so if you want to include both end screens and cards, make sure to include them in different parts of the video.
Another form of video element that YouTube offers is cards. You can think of them as more subtle types of end cards: they are small text cards that appear on the upper-right side of your video, contain your brand, video, playlist, or channel name, and significantly increase visibility and engagement.
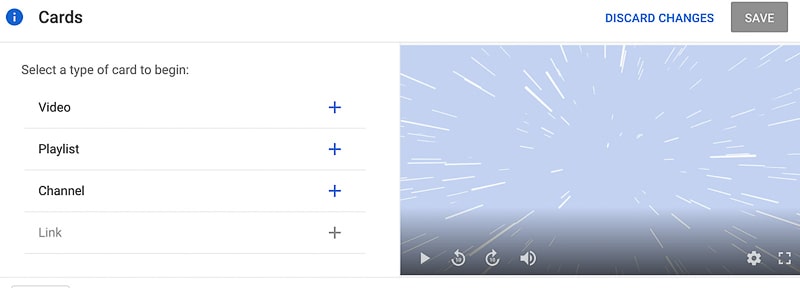
As in the case of an end screen, you can use your video, or search and add any public video on YouTube.

Search and select any playlist on YouTube, or add your playlist. For example, if you are planning to upload a series of videos, you can add the series playlist or a suggested video you think might get them interested.

And finally, you can add a card that takes to a specific channel. In this case, you can choose to combine both your channels or promote another channel. Type custom message and teaser text to grab the attention of the viewer.

In the timeline below, drag the small blue icon to select which part of the video will appear. As opposed to end screens, in case of end cards, you are not limited to the last 20 seconds. However, you cannot set the duration of your end card.
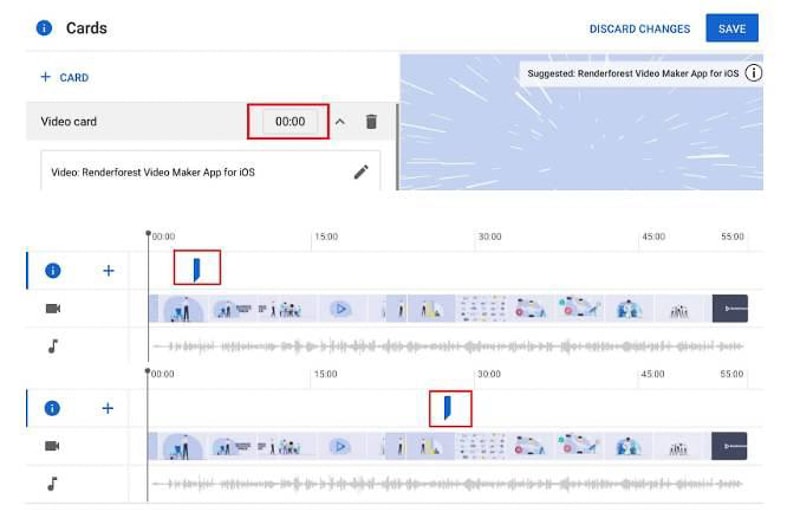
You can add as many cards to your video as you need, but make sure to adjust them accordingly, so the cards don’t overlap, as YouTube can’t show more than one card at a time.

Once you are done, hit “Save.” You’ll be redirected back to the publishing window.

In case you want to add both end screens and cards to your videos, you are free to do so. However, our advice would be to avoid having them simultaneously, as this will distract the viewer, and they won’t know which message to pay attention to.
Adding YouTube end screens and cards to your videos is a wonderful way to increase your videos’ visibility with a compelling and relevant call-to-action. Make them a part of your marketing strategy to boost engagement and attract an audience to your videos.
We hope that the tips above will help you to design effective end screens and cards. Play around with the various elements, test and analyze the results to see which ones perform better, and create a powerful end-of-video experience for your viewers.
Looking for some inspiration to create your next YouTube video? Renderforest has hundreds of templates that you can use to make broadcast-ready videos in a blink—as well as a YouTube intro maker for those first impressions. Click the button below to explore them and start crafting.
Article by: Renderforest Staff
Dive into our Forestblog of exclusive interviews, handy tutorials and interesting articles published every week!
Read all posts by Renderforest Staff

